Support that moves with them
The sofa stays where it is; the walker follows them. At last they can cross the room on their feet, with both hands on something steady.
Sideways steps turn into steps forward.

Trending searches
Shop by budget
1 tap to filterBy age group
Compact rail
No toys found
We couldn't find any toys matching this search. Try a broader keyword or a different budget filter.
Browse all 600+ toys →When is the right moment to bring out a walker for 1 year old toddlers, or for a baby who is not quite one yet? It depends on which walker you have in mind, because in Britain the words ‘baby walker’ cover two very different things: the sit-in walker, where the child sits in a fabric seat slung inside a frame on castors, and the push along walker, a little wooden trolley they push in front of them while standing up. For the second kind, the right time usually comes somewhere between 9 and 12 months, once your child pulls themselves up against the sofa without help and starts cruising along the furniture.
This guide takes you through the milestones month by month, the signs that show your child is ready, the practical difference between the two kinds of walker, what to look for in a stable model, how to set the brakes week by week, a handful of play ideas and a summary table. It ends with straight answers to the questions parents ask most often as those first steps approach.
Already know the difference and simply looking for a model? You will find all our wooden baby walkers together in one place.
The short answer
With a push walker, the most reliable sign is not a number of months but a movement: your child gets to their feet on their own by holding on to something. That usually happens between 9 and 12 months. Our own walkers are recommended from 10 to 12 months, the age by which most children pull themselves up without help.
The differences between children are wide, and perfectly normal. The World Health Organization's reference study on motor development puts independent walking at roughly 8 to 18 months: two children born on the same day may start walking several months apart, and neither of them is ‘ahead’ or ‘behind’. If anything about your child's development worries you, the doctor or health visitor who sees them is the right person to talk to.
Your baby rolls onto their side, sits up for longer and longer, then commando-crawls or gets up on all fours to reach whatever has caught their eye. Every journey across the floor strengthens the back and shoulders and teaches both sides of the body to work together.
The walker: No walker yet: plenty of floor space and a few objects placed just out of reach are all they need.
They grab the edge of the sofa or a coffee table and pull themselves up, first onto their knees and then onto their feet. Getting back down is often harder than getting up: they tend to plop onto their bottom, and that is all part of learning.
The walker: Let them practise on low, sturdy furniture; the walker can stay in the cupboard for a few more weeks.
Once upright, they shuffle sideways holding on with one hand, move from one piece of furniture to the next and sometimes let go for a second. This is the window in which most children take an interest in a push walker, which gives them something to hold that moves forward with them.
The walker: Offer the walker with the brakes on, without pushing it: if they would still rather crawl, try again a week later.
They push the walker a few metres, stop, set off again, and can stand unaided for a few seconds. Their steps are short, feet wide apart, arms often raised to help them balance.
The walker: Loosen the brakes a little at a time, as they learn to keep pace with the walker without being pulled along.
Walking becomes steadier: they squat to pick something up and stand again, change direction and carry things in their hands. The walker now becomes a toy for carrying and building rather than something to lean on.
The walker: Brakes off: they load, unload and wheel their blocks or soft toys from room to room.
Before those first steps, it is floor play that prepares a child best for walking. For the months leading up to them, our guide to the best baby toys from 0 to 12 months sets out what you can offer, stage by stage, and our selection of toys for 6 month old babies and up gathers games suited to this period.
In the shops as in parents' searches, ‘baby walker’ is used for two objects that have almost nothing in common. The sit-in walker holds the child in a fabric seat hung in the middle of a frame on castors: they move around by pushing off with their feet, without ever having to stand. The push walker is a small trolley that the child pushes ahead of them while holding a handle: they carry their own weight, and they can let go whenever they want.
In the Montessori approach, as for many early years professionals, the preference clearly goes to the second. The table below sums up what actually changes for your child.
| Criterion | Push walker (pushed while standing) | Sit-in walker (with a seat) |
|---|---|---|
| Child's position | Standing, behind the walker. They hold the handle and walk behind it, free to let go at any moment. | Sitting in a fabric seat. They sit in a ring slung inside a frame on castors, feet touching the floor. |
| How the feet land | Flat on the floor. The whole foot goes down and each step rolls through from heel to toe. | Often on tiptoe. Many children propel themselves with the front of the foot, without rolling through the step. |
| Who carries the weight | The child. Legs and trunk work together to keep them upright. | The seat. The pelvis rests in the seat, so balancing on two feet is never called upon. |
| Speed | Adjustable on some models. Brakes on the back wheels slow the walker down; when the child stops, the walker stops. | Unchecked. The castors spin in every direction and the walker quickly picks up speed on a smooth floor. |
| What they can see | Their feet and the floor ahead. They see obstacles coming and learn to steer round them. | Mostly the tray. The tray hides their legs: they cannot see what their feet are doing. |
| Stopping, sitting down | Whenever they decide. They let go of the handle and sit down on the floor as soon as they are tired. | With an adult’s help. They cannot climb out of the seat on their own. |
| Age of use | From around 9 to 12 months. Once they pull up to stand alone; afterwards it carries on as a toy for wheeling things around, long after the first steps. | Advised against by many professionals. In principle it is meant for babies who can sit unaided, but it does not teach them to walk. |
Sitting down, the child moves fast and high up, without having learnt how to stop or how to fall. Falls, especially down stairs, are the main reason it is advised against; in Canada its sale has even been banned since 2004. It does not help a child walk sooner: balancing upright, which is the real challenge of walking, is not called upon at all. If you have one, keep it well away from any step or staircase, use it for short spells only and always keep your eyes on your child.
A push walker does not carry the child: it lends them support. Your little one gets up on their own, pushes when they feel ready and stops when they choose. A good one is heavy and wide so it does not tip when they grab hold of it, and braked so it does not run away from them. You will find ours in our push along walker range: every model is pushed standing up, and none has a seat.
Walking starts with knowing how to stay upright on a base that moves. Between the day they first cruise along the furniture and the day they cross the sitting room alone, a child needs to practise hundreds of times: letting go of a support, rebalancing their body and setting off again. A push walker gives that practice more room than the sofa does, without doing any of the work for them.
It does not make a child walk sooner, and that is not its job: it makes those weeks of transition richer and more independent. Here is what it brings, in practice.
The sofa stays where it is; the walker follows them. At last they can cross the room on their feet, with both hands on something steady.
With their feet flat, they feel the difference between floorboards, rug and tiles, and adjust how hard they push with every step.
They set off, stop, let go of the handle and sit down whenever they like. Nobody holds them up, nobody pushes them along: every success is their own.
Once they are walking, the tray carries blocks and soft toys around, and the activity panel can be played with sitting down or standing up.
One limit worth knowing: a walker replaces neither time spent on the floor nor the low furniture your child practises pulling up against. It comes on top of them, a few minutes at a time, whenever your child feels like it.
How do you choose between models that all look much the same in photos? The theme (ocean, forest, workbench) matters for your child's enjoyment, but it is six construction details that make the difference between a walker that helps them and one that makes them fall. Keep them in mind as you read the product pages, and check them for yourself if you see the walker in person.
To get to their feet, a child pulls the handle towards them and downwards. A walker that is too light or too narrow rears up or tips over at that very moment, and their first experience of it is a fall. A wooden model, with a firmly fixed tray or panel, is heavy enough to stay put.
Pull the handle towards you, the way your child will: the walker may slide a little, but it should not tip.
The back wheels should sit roughly under the handle, or just behind it. If they are well forward of it, the walker swings back towards the child as soon as they hang on to it.
Look at the walker side on: the handle should not stick out far behind the axle.
This is the feature that makes the biggest difference in the early days. A knob or screw tightens the back wheels more or less: tightened, the walker moves slowly and acts as a support; loosened, it rolls freely for play. Without a brake, a walker on wooden floors shoots off ahead of the child at the first step.
Check on the product page that the brake really is adjustable, not simply described as ‘non-slip’.
A rubber ring around wooden wheels grips better on a smooth floor and makes the walker quieter, which the neighbours downstairs will appreciate too.
On tiles or lacquered floorboards it is essential; on carpet it is simply a nice extra.
Standing up, your child should hold the handle with their arms slightly bent, without leaning forward or hunching their shoulders. A handle that is too low makes them walk bent over; one that is too high puts them up on tiptoe.
Our Deluxe Ocean and Deluxe Rainbow walkers have a handle about 41 cm from the floor: measure your child’s hip height to compare.
Rounded edges, no small parts that can come loose, a lid that will not trap fingers: your child will grab hold of every part of it, including the places you least expect.
Run your hand under the tray and around the handle: nothing should catch.
Gears, an abacus, shapes to slot in, a chalkboard: it keeps your child busy sitting in front of the walker before they can even walk, then standing during their breaks. A good choice for a child who loves handling things and staying with one activity for a long time.
Wooden blocks stored inside the walker, which soon become a game of building and carrying. A good choice for a child who loves filling, emptying and taking their treasures everywhere.
To decide between two models, compare every wooden walker in our range with these points in mind: the space you have and your child's temperament will do the rest.
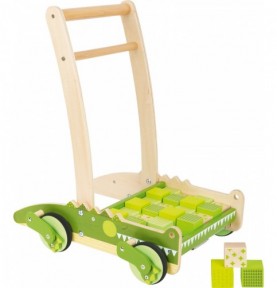
All of these walkers are made of wood, pushed while standing and fitted with rubber-rimmed wheels. What sets them apart is what they offer on top of support: an activity panel to play with during breaks, or a tray of blocks that becomes a building game.
If adjustable brakes are your priority, start with the two Deluxe models, such as the Deluxe Ocean walker. For a child who loves turning, sliding and watching things move, the Flying Animals walker puts its games on the front panel. And if you would rather have a wooden walker with blocks or a classic pusher toy, look at the models that come with a set of blocks.
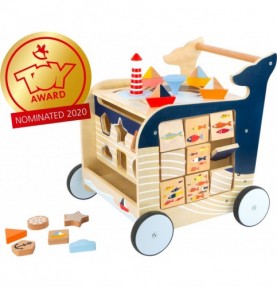
Five play surfaces on a seaside theme: sea creature shapes to slot in, an abacus with sailing boats, nine turning squares decorated with fish, a chalkboard and portholes. The brake is adjusted on the back axle.
For the child who loves handling things: they play sitting in front of the activity table before using it to walk.
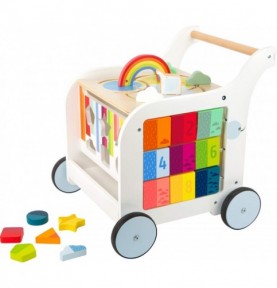
The same base as the Deluxe Ocean, in a multicoloured version: geometric blocks slot through the top and drop into the storage chest, next to an abacus and a chalkboard. Adjustable brake at the back, and a lid designed not to trap fingers.
For children drawn to bold colours and simple shapes that are easy to recognise.
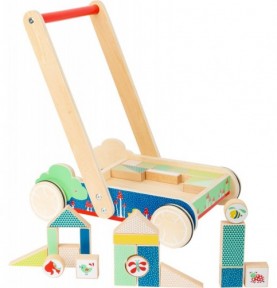
A classic wooden pusher whose tray holds a set of blocks. The blocks come out for building, sorting shapes and filling the tray, again and again.
For the child who loves filling, emptying and taking their treasures from one room to the next.
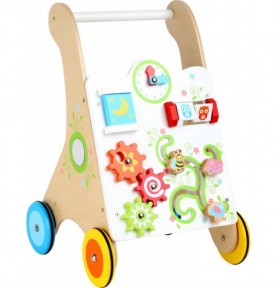
A front panel of games at child height: mazes to follow with a finger, gears to turn and a clock with moving hands, all decorated with animals.
For the curious child who takes long standing breaks between two trips across the sitting room.
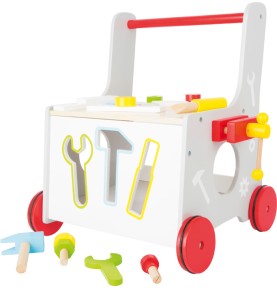
A walker that turns into a mini workbench: a hammer, a screwdriver, a spanner and wooden screws come along for the walk, and then for the first games of make-believe.
For the child who watches the grown-ups doing DIY and wants to join in.
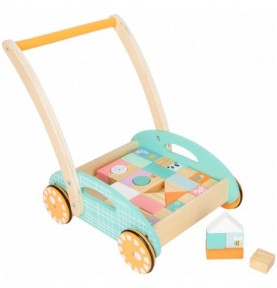
A push walker in soft shades, supplied with 34 wooden blocks. The walker doubles as a storage box: the blocks go back inside at the end of play.
For a nursery in gentle colours and a child who is already building their first towers.
A soft, barely damp cloth is all it needs; avoid soaking the wood or leaving it to dry next to a radiator. Check now and then that the screws and brakes are still tight, especially after the first few weeks, when your child pulls hard on the handle.
A child who walks on their own loves having something to take along. Animals on a string and little toys to push, from our range of pull along toys, take over at around 15 to 18 months, once they can walk while looking back over their shoulder.
Even a well-chosen walker can disappoint if it is offered too soon or set to roll too freely: the child pushes, the walker shoots off, they fall and refuse to touch it again. These few simple steps avoid that false start.
Pick the right moment. After a nap or a meal, when they are rested and keen to move. A tired or hungry child will take the slightest wobble as a failure.
Park the walker against a wall. Rest the front of the walker against a wall or the sofa, with the brakes fully on. For their first attempts, they can then pull up on the handle without anything moving.
Let them come to it. Put the walker near them, without standing them up in front of it. A favourite object placed in the tray or on the panel is often enough to draw them over.
Show them the way. Once they stand without effort, move the walker away from the wall and sit on the floor two or three steps in front of them. Your presence gives them somewhere to head for.
Stop before they get bored. A few minutes is plenty. If they let go of the walker and crawl off, the session is over: they will come back to it of their own accord.
The timings are only a guide: it is how comfortable your child feels that tells you when to move on to the next stage. If they start falling backwards again or get pulled along, tighten by a notch.
The knob or screw is fully tightened, evenly on the left and the right. The walker clearly resists: it acts as a support for standing up and only moves when the child gives a firm push.
Loosen by a quarter to half a turn. The wheels turn with gentle resistance: they learn to keep pace with the walker, slow it down and steer it.
When they stop on their own, go round a piece of furniture and set off again without hesitating, release the brakes. The walker becomes a toy they wheel about, load and unload.
Your walker has no brake? Rest its front against a wall for the first attempts, let them take their first steps on a thin rug rather than a smooth floor, and sit just in front of them so the walker cannot run off too far.
When a baby first shows they want to walk, the most natural reflex is to hold both their hands above their head and walk them along. It is a lovely moment, but they are not the ones doing the walking: you are carrying them.
If they fall, wait a second before stepping in: most of the time they get up on their own or sit back down. A calm word (‘you fell over, you can get back up’) helps them far more than a worried reaction.
A push walker is not just something to lean on: it is one of the first toys a child can really make work by themselves. These games follow their progress, from the playmat to confident walking. Offer one at a time and let them repeat it as often as they like.
What they gain: They get to know the walker sitting down, with no pressure, and then use it quite naturally to pull up.
What they gain: Walking now has a purpose. They learn to stop in the right place and let go of the walker to use their hands.
What they gain: They practise going down and coming back up, a movement that prepares them for walking on their own.
What they gain: They learn to steer the walker and to feel the difference between a smooth floor and a rug.
What they gain: Turning takes more balance than going straight ahead: it is often the stage just before walking unaided.
What they gain: A short, predictable ritual in the Montessori spirit of order: a place for everything, and everything in its place.
To vary the games at this age without filling the house with things, our selection of toys for 1 year old children brings together stacking, slotting and carrying toys that go well with the walker's tray.
In a room set up with them in mind, your child can practise on their own, without you having to say ‘no’ every couple of minutes. Half an hour of tidying is often enough; then go round the room on all fours, at their height, to spot what they will notice first.
Free up a straight line of two to three metres, with no toys on the floor and no chair legs in the way. The walker needs room to roll, and your child needs something to aim for at the end.
Floorboards, vinyl or a thin rug all work well. Thick, deep-pile rugs slow the wheels so much that the walker can tip forwards; very smooth floors call for the brakes to be well tightened.
A stair gate at the top and bottom of the stairs, a door shut in front of any step: the walker must never be able to get near a drop, even with the brakes on.
The sofa, a firm pouffe, a heavy coffee table: these are their first supports. Fix any chests of drawers and shelves they might grab to the wall.
Tablecloths, lamp flexes, chargers: once upright, they grab anything that dangles. Move them out of reach before the first sessions.
Barefoot or in soft slippers with non-slip soles, they feel the floor and grip better. Socks on their own slip on a smooth floor.
When a child ‘won't have anything to do with the walker’, the reason is often on this list. Almost all of these mistakes can be put right within a few days.
Standing a child up in front of a walker does not teach them to get up. Wait until they pull themselves up against a piece of furniture: that is the real starting point.
The walker shoots off at the first push, the child falls and becomes wary of it. For the first few weeks, tighten the brakes fully.
Your help reassures them, but it carries their weight for them. Stay beside them or in front, sitting on the floor, and let the walker do the supporting.
Several short sessions are better than one long one. When they let go of the walker, they have finished.
A push walker is not a ride-on toy: sitting or climbing in it makes it tip over. If they feel like it, suggest a different game.
A sloping patio, a French window threshold, the top of the stairs: even with the brakes on, a walker can pick up speed. Stay indoors, on a flat floor.
Their cousin walked at 10 months, the neighbour's little girl at 16: both are perfectly normal. A walker is not a race, and pushing them will not make them walk any sooner.
The walker still has many months of play ahead of it: carrying, building, tidying up. Keep it within reach.
The ages are averages, not targets: read the ‘What your child does’ column first, as that is what tells you which stage they have reached.
| Approximate age | What your child does | The walker | Brakes | Games |
|---|---|---|---|---|
| 6 to 9 months | Sits up, commando-crawls, gets up on all fours | Not yet | - | Floor play, objects placed just out of reach |
| 8 to 10 months | Pulls up to kneel, then to stand, against furniture | Still put away; low, sturdy furniture to practise on | - | Pulling up against the sofa, toys placed on top |
| 9 to 12 months | Cruises along the furniture, sometimes lets go with one hand | First introduction, front against a wall | Fully on | Play table sitting down, pick up and fill |
| 10 to 14 months | Pushes the walker, stands alone for a few seconds | Main support for crossing the room | Half on | Soft toy delivery round, little course |
| 12 to 18 months | Walks alone, squats and stands up again | Toy for carrying and building | Off | U-turn, tidying up, first toys to pull on a string |
The sit-in walker does not appear in this table: it fits none of these stages, since it spares the child from having to stand.
Short answers to the questions parents ask before and during those first steps.
For a push walker, the kind a child pushes in front of them while standing, the right time usually comes between 9 and 12 months: once they get to their feet on their own by holding on to furniture and start cruising along the sofa. The movement matters more than the age: a baby who pulls up at 8 months can give it a try, while another who still prefers crawling at 13 months can wait. For a sit-in walker, the question is a different one: many early years professionals advise against it at any age.
When parents look for a walker for 1 year old toddlers, they usually mean the kind that is pushed standing up. It comes out once the child pulls up on their own, at around 9 to 12 months, with the brakes on. It acts as a support during the weeks when they are learning to walk, then becomes a toy for carrying and building: many children carry on wheeling it about long after their first steps, often until they are about 2.
If they get up on their own and are already cruising along the furniture at 8 months, they are nearing the walker stage, but there is no hurry. Our walkers are recommended from 10 to 12 months: in the meantime, let them practise against low, sturdy furniture, which does the job very well. When the time comes, offer the walker with the brakes fully on and its front resting against a wall for the first attempts.
A sit-in walker is, in principle, meant for babies who can sit up unaided. But before asking at what age to put a baby in one, it is worth knowing why many professionals advise against it: the child moves fast, high up and without knowing how to stop, and falls, particularly down stairs, are common. In Canada its sale has been banned since 2004. It does not help a child walk sooner, because it spares them from having to stand. If you have one, use it well away from any step, for short spells and always under supervision.
No, and that is not what it is for. The age at which a child walks depends on their own development. A push walker makes the weeks of transition more independent: your child crosses the room on their feet, at their own pace, stops whenever they like and practises regaining their balance. It replaces neither time on the floor nor the low furniture they learn to pull up against.
At home, bare feet or soft slippers with non-slip soles. Your child feels the floor better, grips better and adjusts their footing more precisely. Avoid socks on their own on a smooth floor: they slip. Keep shoes for going out, once walking is already steady.
For the first few weeks, tighten the knobs or screws on the back wheels fully, evenly on the left and the right: the walker should clearly resist being pushed. When your child keeps pace with the walker without being pulled along, loosen them by a quarter to half a turn. Release them completely once they stop on their own and steer round furniture without hesitating. If they start falling again, tighten by a notch.
The walker is rolling faster than their legs can follow. Tighten the brakes; if your model has none, start with its front resting against a wall, try a few sessions on a thin rug rather than a smooth floor and sit just in front of your child. Check the height of the handle too: they should hold it with their arms slightly bent. If they get discouraged, put the walker away for a few days and offer it again without insisting.
Once your child is walking, it takes on a new role: they load their blocks into it, wheel their soft toys about, play with the activity panel and park it in its place themselves. Depending on the child, this often goes on until around the age of 2, sometimes longer with the models that come with building blocks.
It is designed for indoor use. Outside, gravel, grass or even a gentle slope make it unstable or send it speeding off. If you do take it out, choose a flat, smooth surface well away from any step, and stay right next to your child.
Natural wooden materials, rattles and grasping balls designed for first sensory discoveries.